The eBrevet web application is effectively a website designed to look like a mobile application (i.e. an app). Unlike apps, web applications, or web apps, are not downloaded and installed outside the mobile phone’s browser. Instead, you interact with web apps just like with regular websites in your mobile phone’s browser and when you close the browser, all contact with the web app ceases. In other words, a web application does not run in the background on your phone if you have closed the browser.
Log in
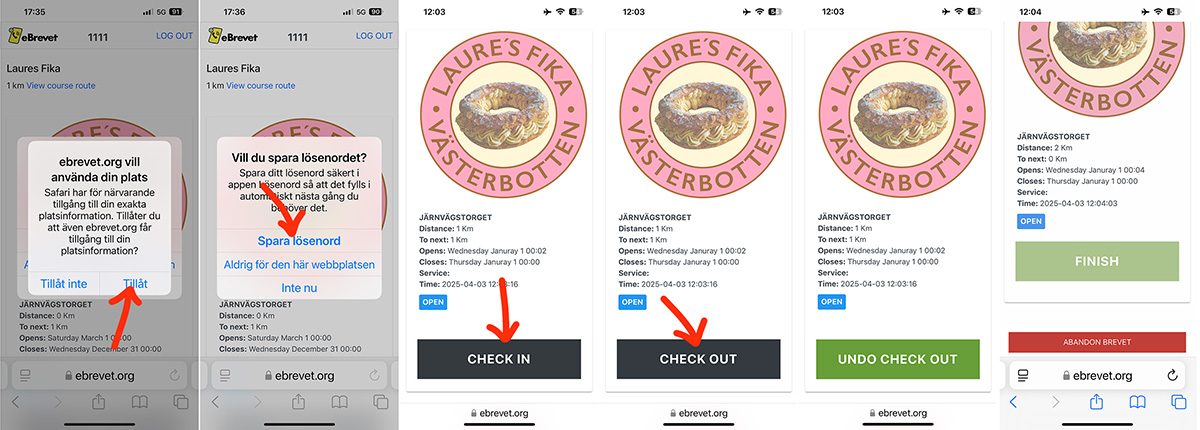
Before using eBrevet, your phone’s GPS needs to be activated. When you log in to eBrevet, a pop-up message will appear asking you if you want to allow location services, i.e. activate your phone’s GPS. Activate the GPS by clicking on the ‘Allow’ button.
Login details for the web app can be found in the email receipt you receive when you register for an event (check your spam folder if you cannot find the email in your inbox). You can log in to eBrevet immediately after registering for an event and familiarise yourself with the route and controls. The link to log in – LOG IN – can be found in the header bar at the top of the website’s home page.
Tip: print the email you receive after registration and take it with you in case you get logged out during the ride. If your mobile phone’s batteries die or you lose it, you can log on to another participant’s phone and check in at a control via it.
Geofencing
The traditional routine at controls is that shop staff at petrol stations and food outlets act as controllers and confirm that you are at a control by writing the time and a signature on your brevet card. When you use the eBrevet web application as a brevet card, the above-mentioned check is done by your mobile phone instead.
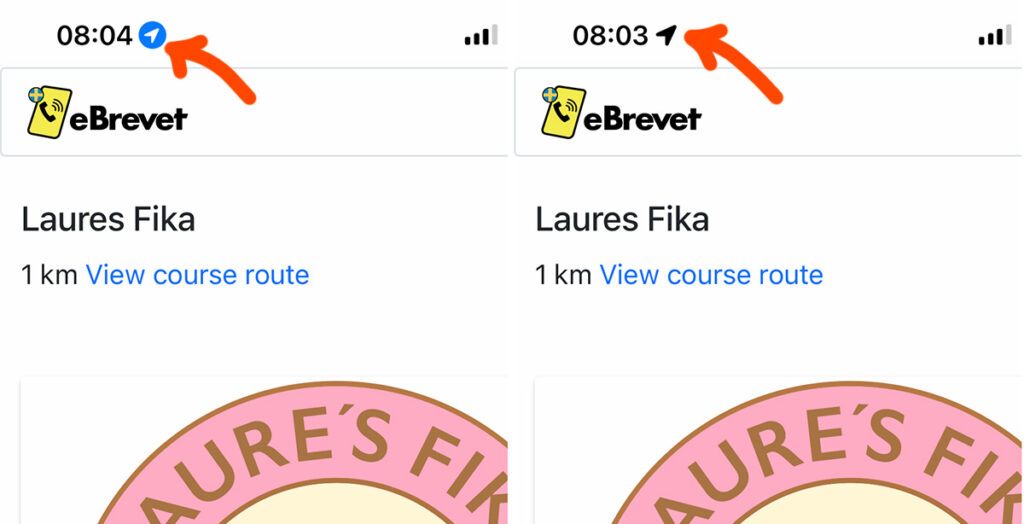
The eBrevet web application uses geofencing to register for the checks, which requires the GPS in your phone to be activated while using the web application. Please note that the web app does not track you continuously. It is only active and sends data about your location when you press a CHECK IN button (see below), so the web app does not drain your mobile phone’s battery by actively tracking you like a training app, nor does it send continuous data.
During the event, you click on the CHECK IN button for each checkpoint visited. When you press the CHECK IN button, the web application confirms that you are at a checkpoint by using your phone’s GPS. If you are within 300 metres of the checkpoint, a timestamp is created in your digital brevet card and the CHECK IN button turns green. The page scrolls down to the next checkpoint. NOTE! If you are out of range of a checkpoint, the pop-up message ‘You are not within range of the checkpoint’ will appear instead.
The first control you check in on is the start control. Once you have clicked on its CHECK IN button, the button becomes disabled. The last control is the destination control and once you have clicked on its CHECK IN button, it will also be deactivated. Thus, checking in on the start and finish controls cannot be undone.
Check in at a checkpoint when you arrive at it and check out of the checkpoint when you leave it. If you check out but decide to stay longer at the checkpoint, you can undo the checkout and check out again when you leave the checkpoint later.
Tip: A useful rule of thumb is that the registration button should always be green when you leave a control. If the button is black, you have forgotten to check in at the control. Establish the routine of confirming that the registration button is green before leaving a checkpoint. So checking in and later checking out should be the first and last thing you do at the checkpoints, just like on hotel stays. If you think you will have trouble remembering the routine, write ‘Check out’ on a piece of tape and stick it to the handlebars!
Tip: if you are at a checkpoint and click on the registration button and see the info message: ‘You are not within range of the checkpoint’, put your mobile phone in ‘Airplane mode’ and reactivate it. The mobile phone should update its GPS position when reconnecting to the telecommunications network.
If you abandon the event, click on the red ABANDON button at the bottom of the page to notify the organiser.
The last control is the finish control and once you have checked in at it, you can close the browser and eBrevet.
Live tracking & statistics
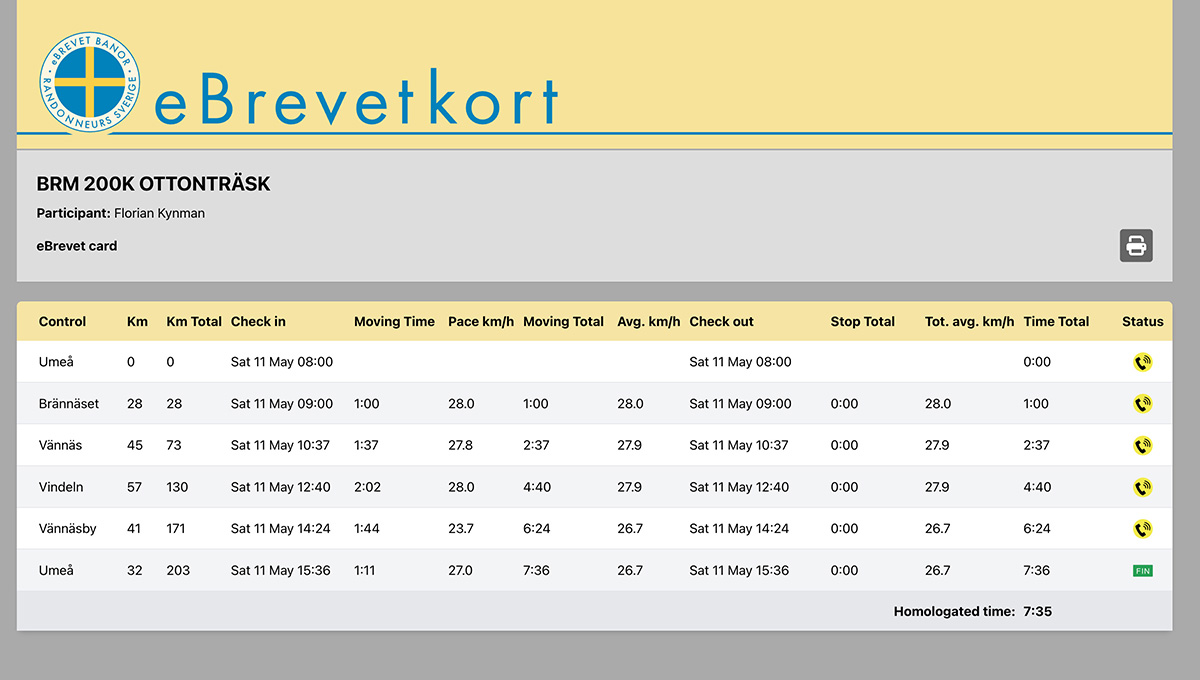
When you use the web app, statistics for your brevet are compiled in a digital brevet card. Your digital brevet card is linked to your start number in the results list for the brevet, see example results list here. In the results list, click on start numbers to see individual eBrevet cards.
Try the eBrevet web app
If you haven’t used the eBrevet web app on the phone you intend to use during an event, please check that its settings allow you to use the web app for electronic registration. To avoid stress before the start, do the following test at least two days before the start date:
Visit the eBrevet website on your phone: www.ebrevet.org.
Log in to the web application by using the login details you received in the registration email. You should then see a pop-up message that the website ”ebrevet.org” wants to use your phone’s location services, i.e. its GPS. If not then you have probably set the phone to ”Never use location services”.
Press the CHECK IN button under the first checkpoint. If you have activated your phone’s location services, you will see the message: ”You cannot check in before startdate: … .”
If you do not see this message, the button is not active and you have not allowed the web browser to use the phone’s location services. In that case, change the settings of your phone’s web browser (Chrome, Safari, FireFox, Edge, etc.). Also, switch off any security plugins that may prevent your browser from sending your location to eBrevet.
iPhone users
Go to Settings > Privacy & Security > Location Services > Safari Sites. Then select the options ”When the app is used” and ”Exact location information”.
Android users
Go to Settings > Location > App Location Permissions. Select one of the options ”Always allow” or ”Only allow when app is in use”. Activate the ”Use exact location” option.
Help desk
If you need help before the event and no one around you can help you, please email: info@ebrevet.org. Include your login details in the email with information about the make and version of your mobile phone and the browser you are using.
Participants in eBrevet-events communicate with the eBrevet website via the mobile phone network. If there is no mobile phone coverage at a checkpoint or if you are unable to check in for other technical reasons, and you are alone and cannot try to check in via a fellow cyclist’s mobile phone, please take a photo and email it to the above-mentioned email address after the event. Include your name, start number, name of the event and checkpoint and also a description of the problem you experienced.